這邊介紹如何在OpenVPN上用SSO認證與AAD(Active Azure Directory)整合,設定分為兩部分,第一部分是在Azure上的AD設定,第二部分就是使用OpenVPN AAD認證套件設定。
步驟一:新增App Registration
找到AAD進去

點選App Registrations -> New registration

輸入名稱,選擇哪個Tenant可以使用這個App,這邊就是看自己個需求

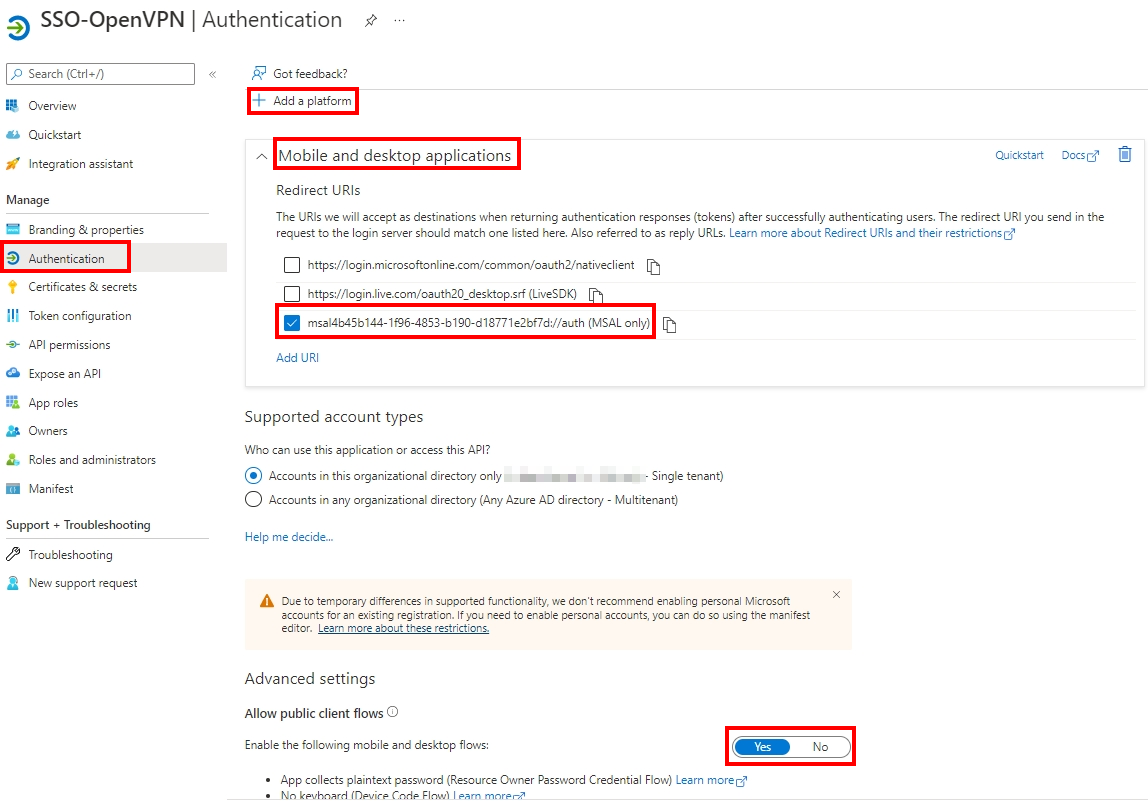
步驟二:新增App Registration
新增完之後選擇Authentication新增Platform,Platform裡面選擇Mobile and desktop applications後新增,完成後選擇MSAL only,最後將Advanced Setting下的Enable the following mobile and desktop flows設定為Yes
步驟三:新增VPN使用者
選擇AAD->Enterprice applications,找到在步驟一建立好的App,選擇Properties,將Assignment required設定為Yes。

在Users and groups新增VPN使用者如下圖,到這邊AAD的部分就設定完成。

步驟四:安裝openvpn-auth-azure-ad
這邊是使用jkroepke/openvpn-auth-azure-ad的程式,這邊先不說docker的部分,直接用指令安裝。
# pip install openvpn-auth-azure-ad步驟五:啟動Managemnent Interface
這邊要回到架設好的OpenVPN Server修改server.conf,新增下面內容後重啟。
# management localhost 7505
# management-client-auth
步驟六:找到Client ID
回到步驟一的App Registration -> Overview把Application(Client) ID給複製下來。

步驟七:找到Tenant Name
打開Microsoft 365管理介面,選擇Settings -> Domain,在.onmicrosoft.com前面帶的就是Tenant Name。

步驟八:啟動認證服務
啟動命令如下,先這樣啟動也比較好debug
client-id 輸入步驟六找到的字串
token-authority 輸入步驟七找到的Tenant name
H 輸入步驟五的OpenVPN Server IP
P 輸入步驟五設定的Port
# openvpn-auth-azure-ad --client-id xxxx-xxxx-xxxx-xxxx-xxxx-H 127.0.0.1 -P 7505 --token-authority https://login.microsoftonline.com/your_tanant.onmicrosoft.com2022-04-18 18:38:29,633 INFO Connecting to OpenVPN management 127.0.0.1:7505.
2022-04-18 18:38:29,635 INFO Connection to OpenVPN management interfaced established.
2022-04-18 18:38:29,635 INFO Running openvpn-auth-azure-ad 2.0.2
步驟九:修改Profile
在Profile新增下面兩行
auth-retry interactauth-user-pass步驟十:將Profile載入後連線
這邊就直接載入Profile連線,username與password可以隨便填就好,重要的是後面與AAD的認證,文章之後再補完。
參考連結
沒有留言:
張貼留言